Image by Shad Ramsey
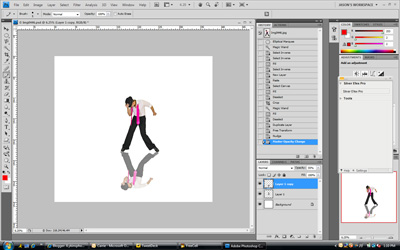
It's been a while... Ok a long while since I put anything on here. I really didn't feel like I had anyone that cared, or read about what I was posting, so I stopped. I have in recent months talked with people that expressed their interest in me writing again, so here I am. For you. Today I'm going to show you a studio lighting setup, and the associated post processing to create the look you see above. So lets get right to it.
The "Dave Hill" look is one of high contrast and heavy post processing. It can be shot as a "headshot" or a full length, although the lighting diagram you see will only provide for a headshot, not a full length. So if you care to learn, hit the jump to see what it's all about.
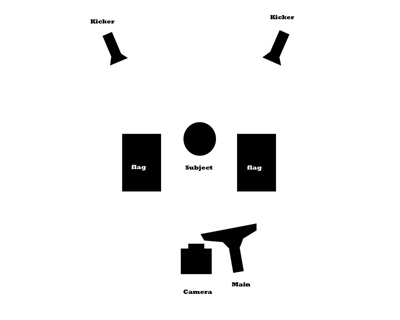
The first and most important thing with this technique is the lighting. If you don't have the lighting right, the post processing won't make the image look right, and you'll get an image that looks funky. This lighting is fairly Simple. You have one main, light(usually on axis, and usually a beauty dish or soft box) and two kicker lights coming at a hard angle. The lighting ratio is usually a 1:1. I like f/8 main and f/8 kickers. Here is a diagram of what the lighting setup looks like:
Now on to the post processing aspect...
Let me start this tutorial by giving credit. I learned this process from one of Scott Kelby's books. Also even if you don't know anything about layers, or if you're new to photoshop, you can do this. I will walk you through step by step. So lets get to it!
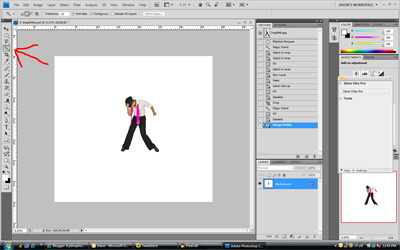
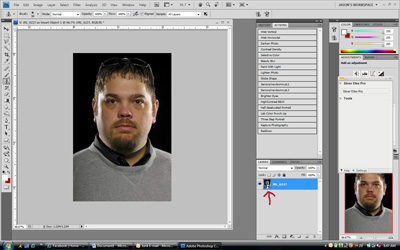
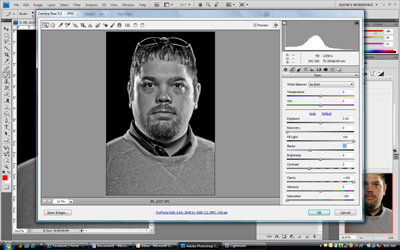
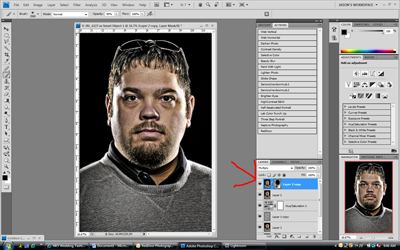
First thing's first, you need to either shoot in RAW for this image OR use photoshop CS4(because it allows you to open jpegs in camera raw). Also you need to click on WINDOW at the top of your screen and make sure that LAYERS is selected. However you workflow goes, be it lightroom first, bridge first, or Aperture first, you want to open the image into Photoshop as a smart object. You can do this from Photoshop by clicking FILE-OPEN AS SMART OBJECT. Once the file has been opened into photoshop as a smart object you will be able to tell it's a smart object by looking at the thumbnail in the layers box. You will see a small "page" icon in the bottom right corner of the thumbnail like shown here:
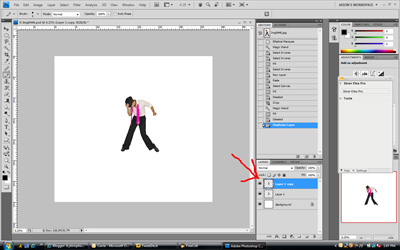
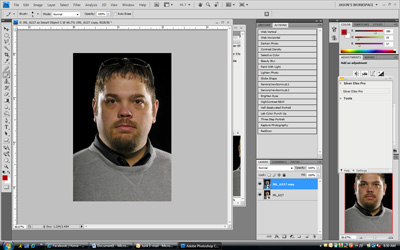
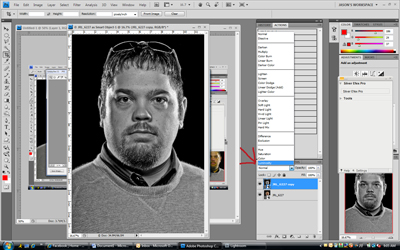
The next thing we need to do is to make a copy of this layer. Now because it's a smart object, we can't make a copy of the layer the traditional way with the keyboard shortcut or even by dragging the layer to the new layer icon. What we have to do is right click anywhere in the smart object layer other than where the small thumbnail is. So basically right click where it says the file name in my case I right clicked where it said JRL_6227. When you right click here you'll get a drop down with choices. You want to chose the one that says NEW SMART OBJECT VIA COPY. This will duplicate your layer without linking the two together. It should look like this:
Now you want to double click directly on the thumbnail of the top layer. That will open just that layer in camera raw. Once opened in camera raw you have some adjustments to make. First we're going to take the FILL LIGHT slider all of the way to 100. This will make it look washed out but don't worry we'll fix that. Now grab the BLACKS slider and move it into the 30's around 33 or so. Next slide the CLARITY slider all of the way to 100. And last but not least slide the SATURATION slider all of the way to the left which is -100. The screen should look like this:
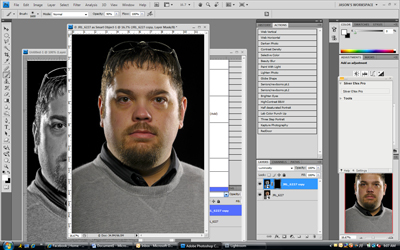
Click OK. Now your image will look like a black and white with a lot of contrast. To get the color back click on the black and white layer and then change the layer blend mode to LUMINOSITY as shown here:
Now we're starting to get there! Ok now we're at a fork in the photoshop road. You have to decide if you want this effect applied to the entire image or just certain parts of the image. Normally if I do a "location portrait" with this look(meaning there is something other than a solid background) I apply it to the entire image, however since this was shot on a plain black background, I just want to apply it to certain parts of the image. To do that make sure you have your black and white layer selected. Hold the ALT key and click on the ADD A LAYER MASK ICON in the layers panel. The layer mask icon is the third from the left. It looks like a small box with a dot in the middle.
your screen should look like this after you add the layer mask:
Now your image just lost all of its contrast(which is what we're trying to add here) so we need to bring it back. Select your brush tool and pick a medium soft edged brush. Make sure that white is the foreground color down in the bottom left of your screen, if it's not press the letter X. Paint directly on your image where you want the contrast to come back through. Don't worry, it won't be white, you're actually painting on the layer mask not the picture itself. Here's what mine looked like after I painted the layer mask:

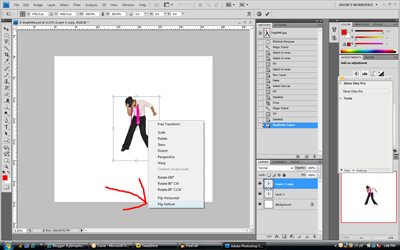
The biggest "trick" to this look is dodging and burning. So what we need to do is make a top layer that combines everything that we've already done. To do this hold down CTRL+ALT+SHIFT and press E. This will make a layer on top that combines everything we've done so far, but doesn't flatten the image(in case we want to go back and make any changes later). Now select your BURN tool. This is the hand shaped tool near the bottom of the tool bar on the left (if you don't see it you may have the DODGE tool in front. It looks like a black sucker, just right click on it and a flyout window will have the BURN tool in it). Now at the top of your screen you will see two drop down menus. One that says RANGE and one that says EXPOSURE. Click on the range dropdown and change it to SHADOWS. Click on the EXPOSURE dropdown and change it to 20%. The menus are shown here:
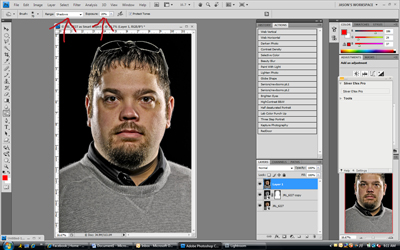
Ok, with the burn tool you want to "paint" over all of the shadow areas of the image. Anywhere it's dark, we're going to make it darker. It may not look like a lot is happening while you're doing this, but trust me it's happening. Once you've painted over the shadows, it's time to switch to the DODGE TOOL. Again right click on the BURN TOOL icon(the hand) on the tool bar to the left, and select the DODGE TOOL(looks like a black sucker). On the menu bar at the top we want to change from SHADOWS to HIGHLIGHTS, and make sure that the EXPOSURE IS STILL AT 20%. "Paint" over the hightlight areas of the image. Again, I know it doesn't look like it does a whole lot, but it really is doing an important job.
When you were doing your DODGING and BURNING you probably noticed that you were starting to get a little color showing up in the form of orangeness. To remove this click on the layer blending mode and chose LUMINOSITY again.
The next thing we want to do is HYPER SHARPEN this image. Before we do that though, we need to Duplicate the top layer. To do this we press CTRL+J . Select your newly copied layer, go to the FILTER menu and select OTHER then HIGHPASS. When the window pops up to set the radius, slide the slider to around 110 as shown here:
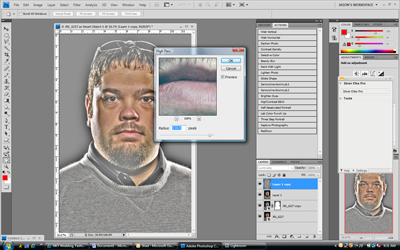
Click ok. Now change the layer blend mode of this newly sharpened layer to SOFT LIGHT. When you do, it should look like this:
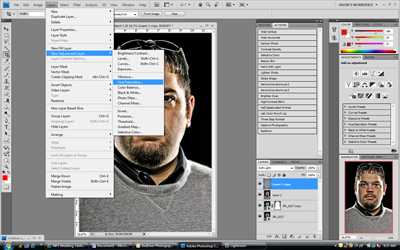
Through all of this, we've started to develop a tint. Usually a red tint to the image. To remove this we're going to add and adjustment layer. Go to the LAYER menu at the top of the screen, then select NEW ADJUSTMENT LAYER-HUE SATURATION.
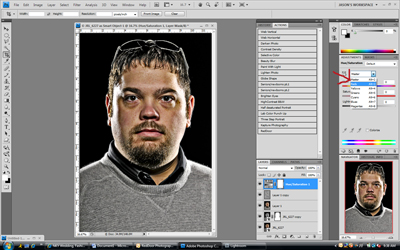
Now depending on the version of Photoshop that you're using, the placement of the HUE/SATURATION BOX may differ. I'm using CS4 so it's on the right hand side of the screen. Wherever the box is, you need to click the dropdown menu that says MASTER and change it to REDS. Once you do, click on the SATURATION slider and drag it to the left.(how much depends on how much red you have in the image.
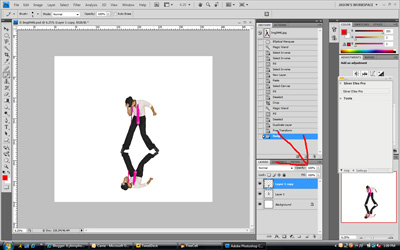
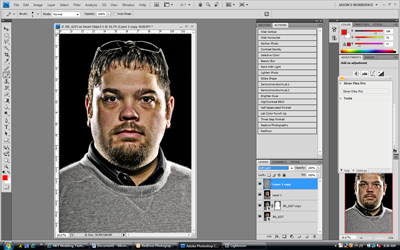
The finishing touch to this process is adding a multiply layer. To do this you again hold CTRL+ALT+SHIFT and press E to create a top layer that combines everything done so far. Once you have done this press CTRL+J again to duplicate that top layer. Now chose your topmost layer and change the blend mode to MULTIPLY. This will create a dark looking image on top. Next you want to add a layer mask to this image, but this time don't hold the ALT key when you click on the layer mask icon. This will create a layer mask that is filled with white for the top(dark) layer. Once again get your brush tool and this time make the brush large. Really large, big enough to cover the entire head/face(don't worry if some of it hangs over into the black). Now set your foreground color to black by pressing the letter D. Once you have done that, click over the head. It may take two or three clicks to get it bright enough. I also "painted" over the left area of the shirt on this image as you can see by looking at the thumbnail of my layermask.
That's it! Simple enough. I hope you like this technique, and I hope that you can apply what you've learned here to your workflow. Jason
Read more on this article...