Thursday, June 25, 2009

Thursday, June 25th


Hey everyone! Glad you found your way back over here for some more great content and news. First I want to do a quick update on the post from yesterday. I got a great link from a guy on Flickr on where to get the remote that I chopped up for $4.80. Go HERE to purchase that. With the Remote and the 1/8inch mono plug, that brings the grand total to under $10.00 US. Not a bad deal considering Nikon wants $90.00 for this thing.

Are you signed up for the photo walk yet? If not you better get going. Only 15 spots left. Also I just started a Flickr Group for this blog. View and join it Here. I'm going to start some photo contests very soon and similar to other blogs contests, you will need to submit your entry via Flickr to the group pool.

Many people may have already heard this,(I guess I just missed it somehow)but Pocket Wizard has pushed back the date of the release of their new Flex units for the Nikon's until the fall. The main hangup was a diversion of resources to fix a problem that was ultimately found to be a result of poor quality control at Canon. It seems that there was an Infrared noise issue found with the older(and by older I mean not brand new off of the shelf) Canon Flash units. They noise varied from very high to just mild, but it was effecting the distance and reliability of the pocket wizard units. I'm not one of those people that will only shoot a certain brand, or that just automatically hate a product because of who manufactures it, but come on Canon, get it together. This has delayed the release of the Nikon units, which by the way aren't having any QC issues during Pocket Wizards beta testing... When it comes to cameras and lenses it's really a push between Nikon and Canon. Really one isn't better than the other, but when it comes to the flash units, Nikon has them by a longshot. Ok, gotta run but don't forget to join the Flickr Group, and the photo walk! Read more on this article...

Tuesday, June 23, 2009

Wednesday, June 24th


I'm on top of things today... I actually got this blog done last night so I didn't have to worry about it when I was groggy and sleepy. I have a great little tutorial for every Nikon shooter out there that wants to be able to trigger their camera with a pocket wizard, but doesn't want to pay $90 for the official pocket wizard cable. So here it is:

You may already know how to do it, and I may the only one that didn't know about this, but here goes. If you are a Nikon shooter and you have Pocket Wizards you may want to control your camera with the drive motor cable that Pocket Wizard offers. The problem is, the cable is $90+! There was no way that I was going to pay that price, so I did a little research and made my own.

Disclaimer first: If you don't know how to solder, or you don't know how to use a digital multimeter, don't try this. I'm not responsible if you screw up your camera or pocket wizard.

The first thing you will need is a 10 pin connector that plugs into the Nikon camera to control the shutter. I got mine from an off brand corded release that I had laying around. I just cut it in half. It looks like this:

Photobucket


Next you need an 1/8 inch MONO plug that looks like this:


Photobucket

I used the small cable that came with my pocket wizards. I just cut off the PC end.

Now once you have those two plugs cut and both the outer and inner insulation stripped from the wires you will need to test them to see which wires are which. First test the 1/8 inch plug to see which wire goes to which part of the plug. In my case, the red wire went to the tip of my 1/8 plug, and the white wire went to the ground or ring part of the plug. Write this down, you will need to remember it.

Next you need to test out the 10 pin to see which wires are which. Look at this diagram below to reference:

Photobucket

When you strip back the insulation on the 10 pin's cord you should see three wires. Set your Meter to Continuity, and attach one of your meter leads to one of the exposed wires. Now test the three pins labeled above and write down what the wire is. Do this for all three pins marked above.

Once you have this information, attach your Auto Focus, and shutter release together and solder them to the wire on the 1/8inch plug that led to the TIP. Solder the third wire to the remaining wire from your 1/8inch plug. Tape them all up and you're in business. Here is a finished shot of mine:

Photobucket

I didn't have any heat shrink left, but the next time I make it to the store I will be getting some to encase the connections.

The reasons that I wanted to be able to control my camera with a pocket wizard are these; first I want to be able to mount the camera to a tripod and stand next to it and converse with children and make faces and such to get them to smile. I think it's easier to get good smiles when you're not right behind the camera. If I can just hold the pocket wizard in my hand and snap without them knowing I'm about to, that would be great. The second reason is for weddings. We are going to start placing a camera on a clamp high up, maybe in the rafters if we can access it. We plan on having a wide angle lens and just snap away during the ceremony as well as do the same thing during receptions. This will give us some interesting shots I think. The pocket wizard makes that possible.

I had all of these pieces laying around, so it didn't cost me anything to make this cord. If you had to go buy the remote and the 1/8 inch plug you may have $40 or $50 invested in Thanks for reading! Jason Read more on this article...

Tuesday, June 23rd


Good morning everyone. I've already sent out emails about this promotion we're doing so you probably already know about it, but I figure it's worth repeating. Starting tomorrow Wednesday 24th we're going to be doing 4th of July photos. we will be doing two different backgrounds. One white, and one Red. The Shot taken above is the red background. The package is $55 dollars for two printed poses. You get 3 8X10's, 4 5X7s, and 8 wallets. If you would like an appointment, please call or email myself or Shad to do that.

Today is the last day to submit your photos to the Strobist's Bootcamp II assignment. If you want to participate, better do it today.

If you are planning on attending my photo walk on July 18 better hurry and sign up. There are only 18 spots left. To find out all of the details click Here. Nikon just joined in on the sponsorship side of things and has thrown in a D700 with a lens to the prizes.


I thought today I would tell you all about one of my most used actions, actually 2 different actions that accomplish the same thing in the end. I call them web vertical, and web horizontal. Real creative names I know. I post images on the Internet almost every day, and if not, I am at least sending an image through email every day, and using the full size images is almost impossible with my slow blackberry connection for Internet here at work. This is what I do:

Open the image you want to re size for the web in photoshop. Go to your actions tab and create a new action. Name it either Web vertical, or web horizontal depending on which format of image you have open. Now go to IMAGE-IMAGE SIZE then change the highest number(width or height) to 800. The opposite of the one that you changed will change automatically to keep the correct proportions for the image. You can now stop recording by pressing stop on the actions tab. Now you have an action to change the image size. I know it doesn't sound like much, but when you are resizing a bunch of images for the web, it's nice to be able to open and re size each image fast. Make sure you change your actions tab back to button mode when you are done recording the action. Now whichever version you did first, now do the opposite. Now you have a resizing no matter what the orientation of the image.
That's it, that's all. I'm outta here for the day. I have to finish editing photos from Saturday so I'll see you all later. Jason Read more on this article...

Monday, June 22, 2009

Monday, June 22nd


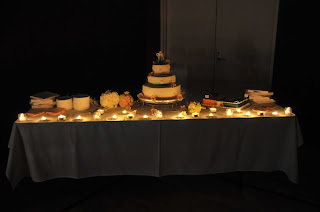
So what do you do when you are trying to take photos in a dark candle lit gym where the lighting is no better than this shot above? You make the sun come back via 4 1200 watt Strobes...


Photobucket


Good morning everyone. Hope everyone had a great fathers day. I Started mine off watching Little Mermaid with my twins, then enjoyed a great cookout at my wife's aunts house. Then over to my moms to lounge around the pool. By the end of the day I felt like a beached whale. The shots you see above are from a wedding I shot Saturday night. Worst two images of the night, but they show you the lighting situation and my remedy for it. By the end of the night the guests were so tired of having their eyes adjusted to the dim candlelight and then getting lit up by all four strobes firing at once, that they were sneaking up with disposable cameras and taking pictures of my face just to pop a flash in my eyes.

I was thinking that we should get into some kind of routine. It would allow you to know what was coming on a particular day, and it would help me by giving me topics to write about. So from here forward(or until I get bored with this format) Mondays are going to be "Back to the Basics" day. Starting today, every Monday I'm going to cover things that may seem simple, or second nature to many, but to many others it might not be something that they know. Many of these topics have been covered before, so if it seems like something that you already know, read it anyway you may learn something that you forgot. ;~) On to today's post!

Lets start at the beginning. I mean way back. Lets start with the different options you have on your camera for shooting modes, and why/when you would use them. On the top of many of your cameras you will have a command dial that looks something like this:

Photobucket

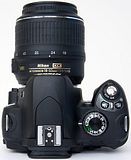
If you are familiar with point and shoot cameras you will be familiar with the little running man photos, the mountains, the small face button, and the little flower icon. What you may not be familiar with , are the P, M, A, and S. These stand for Program mode(P), Manual(M), Aperture Priority(A), and Shutter Speed Priority(S). Avoid the settings with the pictures on them. Stick with the P,M,A,and S. They will get you the best quality, and if used properly you will have far more creative control of the image. After all, that's the goal right? Being creative?

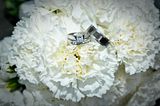
Lets start with Aperture Priority since that is the most commonly used setting. The reason it is the most commonly used is because it allows you to control the amount of focused area in the image. The larger the aperture(the smaller the number) the smaller the area in the image that is in focus. Conversely, the smaller the aperture(the larger the number) the larger the area of the image that will be in focus. So for example in this image below I used a very large (small number) aperture. It was shot at f/2.8 making just the rings in focus and everything else go sort of fuzzy or out of focus.

Photobucket


The same applies in reverse. If you use a lower(higher number) aperture, you will get everything in the image in focus from front to back. As seen in this image:

Photobucket

When you are in Aperture Priority Mode, you set your aperture according to how much of the image you want in focus, and the camera determines the correct shutter speed for the exposure.

Shutter speed is just as it sounds. It is the speed at which the shutter opens and closes. This is represented (usually) in an expression such as 1/250th. This means that the shutter will be "open" for 1/250th of a second. When you are in Shutter priority you set your desired shutter speed, and the camera figures out the correct aperture for you. Most of the time I don't go into this mode because I like to choose how much of my image is in focus. I generally stay in Aperture priority mode or Manual. That brings us to our next mode, Manual.

In the Manual mode you set everything. You decide the Aperture, as well as the shutter speed. This mode is what I recommend to anyone who is just learning their camera. Use manual, adjust things. See what happens. This will give you a better understanding of your camera as a whole.

Program mode is a best of both worlds kind of mode. In program mode, you can choose the Aperture, or the Shutter speed and the camera figures out the other setting for you. So for example you are in program mode, and you decide that you want to isolate your subject. All you have to do is roll your command dial so that the aperture is larger(smaller number) and your camera will figure out the shutter speed for you. It will also do the opposite though. If you want to set your shutter speed a certain setting, the camera will adjust the aperture accordingly. It really is a nice setting.

Ok I have to run for today. I have a ton of images to edit from the weekend as well as last Friday. See you all tomorrow! Jason Read more on this article...

Thursday, June 11, 2009

Thursday, June 11th


Now that's some funny stuff right there! Joe McNally has a new blog and website that, really didn't change as far as content go, but look the same now. It's all about branding these days, so he wanted his website and his blog to look the same. We should think about that... Found some interesting news today about Nikon's next camera release. The rumor is that the updated version of the D300 and the D3 will be released at the same time in the fall. This doesn't matter much to me because the improvements aren't going to be worth the extra money to upgrade so I'll stick with my D300. I hope to upgrade to a full frame, possibly the D3 by the end of the year. We'll see how things go, and whether or not the boss(note: Wife) allow that. I'll definitely keep the D300 as a second body, and backup. On to something that you maybe didn't know before.

The metering system for the Nikon flash and the Nikon camera are different. But you say, "Jason, isn't it TTL or through the lens metering? How could it be different". Well it is. The camera bodies have three settings, Spot, center weighted, and matrix. Spot metering uses the very center section of the lens to meter the scene. It only takes a reading from the center 6mm(or 8 or 10 depending on what you have it set on) of the lens. Matrix metering takes a reading of the entire scene and tries to expose for the entire scene. Center weighted does the same as matrix, only it gives more "weight" or priority to the center 6mm point. Now no matter what you have your camera's metering style set on, the flash only meters like spot. It only takes a meter reading from the center 6mm. This is fine if your subject is smack dab in the middle of your scene, but sometimes we want to compose them to the left or the right in the scene. This can become a problem. If you are shooting a wedding, or an event where the pace is fast, and no one is standing still, you don't have a choice but to go with it and adjust your flash compensation when possible. But if you are composing a portrait where you are using speed lights wirelessly, you can utilize the FV or flash value lock of your camera. It varies from camera to camera so refer to your manual on how to actually set the flash value lock. What you would do in the above situation is first take a quick photo of your subject with them directly in the middle of the scene. press your flash value lock button. The flash is now locked at that output that it just produced. Now you can recompose them to the right or the left of your scene and take another photograph. This time the light on them should stay the same as it did in the first photograph. Don't forget though, if you change scenes, you have to hit the flash value lock button again to "unlock" it. Try this at home for yourself to see what I mean. I think you'll be surprised.

I hope everyone has a wonderful day, and I will see you all back here tomorrow. Jason Read more on this article...

Wednesday, June 10, 2009

Wednesday, June 10th


Good morning everyone. I've got a few things to tell everyone about before we get into any solid content. First up until recently when I got to work every morning, I would setup my laptop, and start to browse my usual blogs, news, etc. This was time consuming because there were quite a few of them, and I had to open every new page and then decide if there was anything worth reading that particular day. Well no more! After reading Scott Kelby's blog yesterday about Alltop I decided to give it a try. I love it! It follows the blogs that you want everyday so you go to one place to find all of your content. Once there, all you have to do is hover over the content that you think you want to read and it will give you the first paragraph without having to actually click on it. This is great! If you're interested in seeing what I follow click here: Jason's Alltop.

It's back! Bootcamp over at The Strobist. It's free to participate. Great prizes, and you'll likely learn a thing or two. I'm already planning my first shot... I can't wait.

There is something else I want to tell everyone about. Many of you may already know about it, maybe you don't. If you're on Twitter, you need Tweet Deck. Tweet deck keeps track of all of your happenings on Twitter automatically and updates you when someone tweets, or when they direct message you. It also keeps track of your Facebook if you want it to. It will alert you when someone changes their status. It's great. Here's a screenshot of what mine looks like at this particular moment:

Photobucket


Try it out, I think you'll like it.


I finished The Hot Shoe Diaries for the third time last night. I am really glad that I re-read that book. There were things that I missed the first and second time through. There are probably things that I am still missing so I'm sure at some point I'm going to go back through it again. I want to give you all some of the useful information that I gained from that book. These tips are not by any means a representation of all of the content and knowledge that is presented in that book. Rather a series of things that I didn't know before the book that now I do.

Global adjustments verses local adjustments. When you are in aperture priority mode and you make an exposure compensation by pressing the exposure compensation button shown below and rolling the command dial

Photobucket

you change the global exposure for the camera AND the flash. So for example if you are taking a photograph of someone and you want the background to be a little darker and more saturated, you would press the exposure compensation button and roll the dial until you see a -1.0 or however dark you want to go on the background. When you do that though, you are turning the power on the flash down as well. The flash will go that same amount darker because that exposure compensation button is GLOBAL meaning it effects everything. To compensate, and make your subject lit properly you have to adjust your flash back up. You do this with the flash compensation. It differs from camera to camera and flash to flash so refer to your manual on how to adjust the flash compensation. Also, just because you go say -1.0 on the exposure compensation, doesn't necessarily mean that you will go +1.0 on the flash. I generally start at the positive amount on the flash corresponding to the negative amount on the exposure compensation, but I usually go up or down from there depending on what the image looks like. This little trick will give you wonderful, saturated backgrounds and well lit subjects.

To go along with the first bit of information learned, I learned that even though the exposure compensation is overridden on the camera when you go into Manual exposure mode, the exposure compensation still effects the flash. Let me explain. Lets say that you are in aperture priority mode, and you have the exposure compensation dialed to -1.7. Then you decide that you'd be better off controlling the exposure manually so you switch to manual exposure mode(indicated by the M on your camera's control dial). When you switch to Manual, the exposure compensation is no longer effecting the exposure portion of the camera. If you want to adjust exposure now you change your shutter speed and/or your aperture(f/stops). The exposure compensation does however still effect your flash. So in our example if you have your exposure compensation set at -1.7 when you decide that you're going to go into manual, and you don't change that back to 0 before you switch, your flash will be underexposing by 1.7 stops in every image. The moral of the story here is, make sure you set your exposure compensation back to 0 before you switch to manual mode.

There are many many more tid bits of info that I took away with me from that book, but I think from now on, I'll do a random "bit of information" every day. Sometimes it will be from that book, sometimes it will be from my own experience, and sometimes it will just be something I've heard and tried that worked.

See you tomorrow. Jason Read more on this article...

Tuesday, June 9, 2009

One more thing

Ok so one more thing for today that I forgot to talk about earlier. David Hobby over at the Strobist is starting "Bootcamp2". What is this you say? click on the link to find out. And believe me, it will be worth your time to participate! Jason Read more on this article...

Tuesday, June 9th 2009


Morning everyone! It's a rainy, sleepy kind of day here in Cincinnati, but I'm up and at it so I thought I would do something productive and update my blog (which I should be doing daily). Sometimes people call us and want photographs taken that quite honestly seem a little boring. I mean it may be interesting to them, or it may be the most important thing in the world to them, but to me, it's just kind of boring... This was not one of those times. My good friend Danelle opened a dance studio in Blue Ash and her grand opening was last weekend. She had a bunch of people there doing different dance routines including some pole dancing, hip hop, Zumba, and more... Shad and I got the privilege of covering this event, and I couldn't have asked for a better time. The women were beautiful, the music was good, and the lighting was easy. It doesn't get much better than that! The things that made the lighting SO easy were the large wall of floor to ceiling mirrors, and my Gary Fong light modifier. The modifier is a great little addition to any photographers arsenal, and without a doubt the best way I know of to deal with ever changing lighting situations. More on this wonderful little piece of plastic below. Also if you are interested in learning any form of dance, call Danelle at 513-469-7929 or just click on the "Sway" link on the upper right of this page.

Gary Fong is a genius. Not because of this wonderful light modifier he designed. Not because he took $3 worth of plastic and molded a $40 light modifier; because he used to charge $150 per wedding, but profited an average of $6000 per wedding. Selling albums and prints is where the money is in wedding photography. I want those profit margins, and honestly that's what I'm working towards. But that's not what you're hear to read about. You don't want to know how some jack ass made a killing selling wedding albums. You want to know how I got that wonderful "wrapping" light in that image above with one speed light and a piece of Tupperware. Read on my friends, read on.

Photobucket

Photobucket

Ok so it's not Tupperware, but it sure looks like it doesn't it? Ever been to a wedding and seen a photographer walking around with one of these on top of his or her flash? Ever wondered what it was, or how it's used? Well I'm going to explain. The basic idea of the LightSphere is that the flash hits the top "dome" and gets reflected throughout the sides in all directions. Some light gets through the dome and hits the ceiling(if there is one) and bounces back onto the subject, but the rest of the light exits the sides and bounces all over the place lighting the whole area. Great for wedding photographers, not so great for the guy standing behind the wedding photographer that gets blinded. The really nice thing about the light sphere is the ability to switch from portrait to landscape quickly, again this is really important for wedding photographers. You can watch a small video put on by Gary below.


As you see in the video these units are great for using indoors and out. They work really well when the light is changing because you don't have to worry so much about finding a white wall, or a white ceiling to bounce your light off of, you have a bounce built right in with the lightsphere. At $40 it's something that every photographer can add to their collection of modifiers and use when needed.

Alright, that's it, I'm outta here for today. I'll see you all tomorrow. Jason Read more on this article...

Friday, June 5, 2009

Friday, June 5th


Hey Everyone. It's Friday! I'm down at the studio right now setting up for tonight's Shop Bellevue. Getting the Studio straitened up, and of course testing out the new Pocket Wizards. I hope to see everyone down here tonight. We're going to be here until 9pm tonight, so come down and have some fun with us. The address (for any of you who haven't been here yet) is 421 Fairfield ave. Bellevue Kentucky.

So we hooked up the Pocket Wizards to the strobes today. They work Great! There are no "false fires" or "fail to fires". To test the distance out we went up the street behind a car as shown here:

Photobucket

Didn't work. I was maybe 1000 feet away going through brick. I couldn't get the flash to fire until I was three more cars forward. All in all though they work great. If you don't have pocket wizards yet, and you plan on doing any off camera flash, you need them. Now's the best time to buy them too. Lowest price they have EVER been with the mail in rebate.

Ok gotta run. I have to get this place ready for tonight. See you here! Jason Read more on this article...

Thursday, June 4, 2009

Thursday, June 4th


Hey everyone. Nothing exciting about this shot really. Just a high key shot of another photographer at the workshop yesterday. I just wanted to share it with you so you could see a little more of what we did yesterday.

I just got the details all hammered out about the photowalk that I'm leading here in Cincinnati. For all the info go Here. There are only 50 spots available so act quick if you want to participate. There are thousands of dollars in prizes to be won. It should be a great time!

I promised everyone that I would do a review on the Pocket wizards today, so here goes. I picked up a pair of the Pocket Wizzard Plus II's yesterday. I have been putting it off for so long now and I decided to get off of my laurels and get some. The reason that I was waiting was because (as many of you already know) they are due to release the TTL Flex units for Nikon at the end of this month. I have some shoots coming up that I will need them though so I got some "regular" units for now. Don't let that fool you though. These puppies aren't any slouches though. To start with they have a 1600 foot range, will fire speedlights(flash), studio strobes, as well as trigger Camera's(something the new flex units can't do). Really the only thing that it can't do is TTL metering. To be honest, I can work with the Nikon CLS system when I need TTL metering. So what do you get, and how much do they cost. Well right now, for $169 you can get a Pocket Wizard Plus II shown here:

Photobucket

Right now Pocket Wizard has a rebate going for $35 off each unit. This is huge. I've never seen them this cheap before. So here's the skinny, if you want to be able to take your flash off of your camera, and place it up to 1600 feet away and be able to fire it consistently, you need a pocket wizzard. If you have studio strobes and are tired of tripping all over the cords hanging all over the place, you need a pair of Pocket wizzards. They are solid, reliable, all around wonderful units that are backwards compatible. This is important when I go to buy the Pocket Wizzard Flex units to be able to do TTL. They will all work effortlessly together.


Tomorrow night is the monthly "Shop Bellevue" happening in our business district. All of the shops will be open until 9pm giving away things, or giving away things at a discount. We're going to be hanging out with beer and wine if anyone wants to stop down, you are welcome to. see you all there! Jason Read more on this article...

Wednesday, June 3, 2009

Wednesday, June 3rd


I attended a studio lighting workshop put on by Bob Ebersole of the Camera Club of Cincinnati. He did a very good job of explaining things so that people could understand them. The model didn't show, so many of the attendees "sat in" and this shot above is of John Stuedle. John has an awesome face for a textured photo look. I really enjoy photographing him. Anyway it was a really good time, and I hope to do it again soon.

An update on the Photo Walk in Cincinnati. David Zisers walk filled this morning so that means my walk went live. I'm currently finishing the final details on it and I should have it up and active tomorrow so that everyone can start signing up. We're going to have a good time, and someone is going to win a free copy of Scott Kelby's new book, and maybe a whole lot more!

The price of the D300 dropped today on Amazon to the $1500 mark. The rumor is that Nikon has a "S" version of the D300 coming out soon similar to how they did the D70 and the D70s. We'll see. So far all of the specs that have been rumored haven't been enough to make me want to upgrade.

That's all I have for tonight. Tomorrow I plan on doing an in depth review on the Pocket Wizard Transceivers. See you all then.

P.S. Clear your calenders for this Friday evening. It's that time again. The first Friday of the Month is Shop Bellevue and we're going to be open until 9pm. Come hang out with us and get a free 5X7 shot in the studio. See you all there! Jason Read more on this article...